Right-click the column headings and choose Column Chooser from the shortcut menu.
Drag the columns you want to see from the Column Chooser dialog to the Search Results pane.
To hide a column, right-click a column heading and choose Remove this Column from the shortcut menu.
You can add custom columns to the Search Results pane to store additional information about media files. When you add custom columns, they are added to the current library only.
For example, if you wanted to keep track of which removable hard drive contained a media file, you could create a custom Drive Number column to assign any numeric rating to a media file. You could then use the Advanced section of the Search pane to search using the Drive Number value.
When adding media to a library, you can choose to add this information by selecting the Add tags and custom columns from files check box in the Add Files to Media Library dialog.
Right-click the column headings and choose Custom Columns from the shortcut menu.
Click the Add New Column button to add a custom column. A new entry is added to the list.
In the Name box, type the name you'd like to display as a column heading.
Select the Type box and choose Text or Integer from the drop-down list to indicate whether you'll store text or numeric data in the column.
If you want to remove a custom column, select an entry in the list and click the Delete Selected Columns button . The column and all data stored in the column is removed from the library.
Click the OK button. The column is added to the media library, and the Search Results pane is scrolled to the right to display your new column.
Drag a column heading to a different location in the Search Results pane to move it.
Drag the splitter between columns to adjust column width, or double-click a splitter to adjust the column width automatically.
Click a column heading to sort the results in ascending or descending order based on that column.
Some columns in the Search Results pane can be edited. When an entry in the Search Results pane is selected, click a box to make it editable. You can then type new information in the box.
Changing a column's contents affects only the entry in the current media library. Click the Save Tags and Properties to Files button to save the properties with the media file.
If you're working with videos or still images, the thumbnail view helps you see the files that match your search criteria.
To switch to thumbnail view, click the down arrow next to the Change Search Results View button and choose Thumbnail.
You can drag the slider at the bottom of the Search Results pane to adjust the size of the thumbnails.
When you select a file, the thumbnail is magnified. You can change the zooming behavior on the Thumbnail tab of the Media Manager Options dialog.
You can choose which frame you want to use as a thumbnail for video files:
Right-click a thumbnail in the Search Results pane and choose Choose Thumbnail from the shortcut menu. The Thumbnail Chooser dialog is displayed.
Drag the slider in the Thumbnail Chooser dialog to set the frame you want to use.
Click the OK button.
If a media file's media is offline, the thumbnail is displayed with a red line through it:
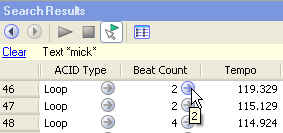
If an item in the Search Results pane displays a button, you can click it to find related media. For example, clicking the button in the following example adds an item to the Advanced section to help you find other media with a beat count of 2.
If you want to make more room for the Search Results pane, you can minimize any of the panes in the Media Manager window.
Hover over a splitter between two panes. Your mouse pointer will be displayed as a .
Double-click the splitter to minimize/restore the pane.
The Properties pane displays extended information about the selected file in the Search Results pane. You can view and edit file attributes and view a listing of all tags that have been applied to the file.
Properties that are editable are displayed in black.
Right-click a file in the Search Results pane and choose Show Properties Pane from the shortcut menu to toggle the display of the window.
Perform the following procedure to save tags and properties to files.
Saving tags and properties to files makes all your organization portable: if tags and custom properties are saved to files, that information will be preserved in the files and can be added to the library by selecting the Add tags and custom properties from files check box in the Add Files to Media Library dialog.
Saving tags and properties to files affects only the current media library and libraries that you create after saving the information. If you have multiple libraries, you can add embedded tags and custom columns to existing libraries by opening the desired library and rescanning your media folders with the Add tags and custom properties from files check box selected in the Add Files to Media Library dialog. Embedded file properties are also updated when you preview or add media to a project.
Perform a search to find the files for which you want to save tags and custom properties.
Select media files in the Search Results pane. Hold Ctrl or Shift to select multiple files.
Click the Save Tags and Properties to Files button (or right-click a selected file and choose Save Tags and Properties to Files from the shortcut menu).
Information about tags associated with the file or information that you edited in the Search Results pane is saved to the selected files.
If the media file does not support embedded metadata, the Media Manager tool will create an .sfl file (using the same base name as your media file).
Customizing the Search Results Pane |
If you have a large media library, your searches might produce many matching files. You can customize the Search Results pane to fit your workflow and refine your searches.